Today we return to the topic of Docker, this time focusing on good practices. If you're already familiar with Docker software, we encourage you to read on. If not, we recommend our series on this topic.
Docker - good practices, what are they?
A set of good practices applies to every small and large field in computer science, and containerization or virtualization is no exception. The best practice sets often cannot be fully implemented due to limited time, knowledge, or technological requirements, but it is an ideal that engineers should strive for. As for containerization itself, in 2017, Redhat published principles that can be compared to SOLID principles in object-oriented programming. If you want to delve deeper into this topic, we encourage you to read this article on our blog.
It explains not only the secrets of good containerization but also what virtualization is and how it differs from application or system containers. Today, however, we will focus on more specific tips for containerization using Docker.
Use official, verified images - if you are using an image, it's worth checking if it truly comes from a good source. By default, Docker uses Docker Hub, where many companies upload images of their products such as node or python. On the Docker Hub website, there are special filters that allow you to distinguish between official, verified, and unverified images. The number of downloads may also provide a hint, but the designation by Docker Hub creators is crucial here.
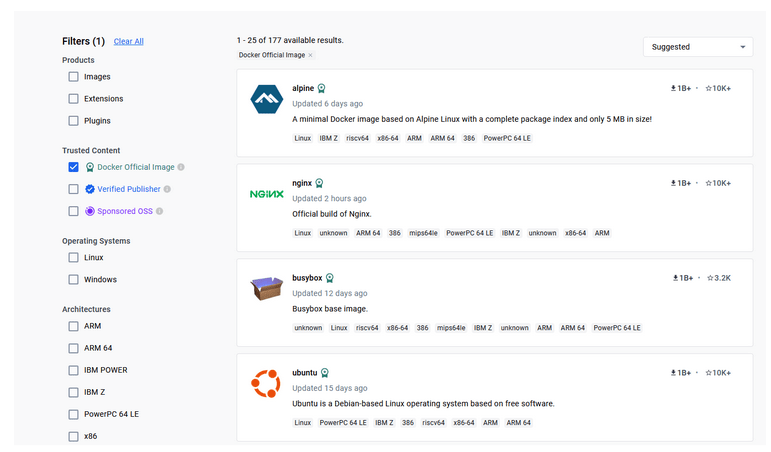
Figure 1 - Docker Hub, filtering for official images
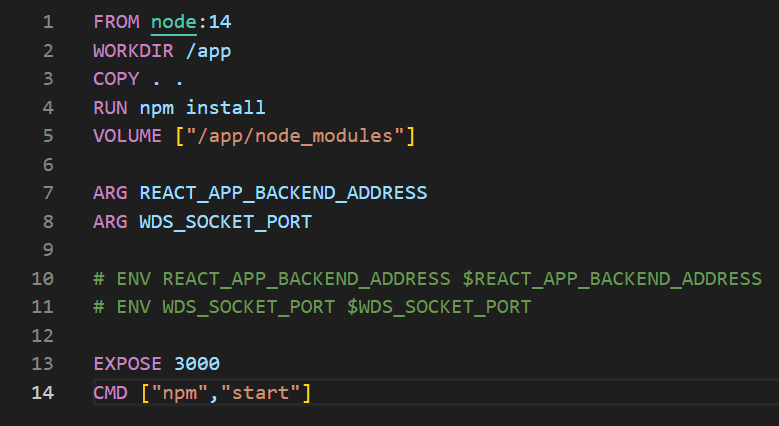
Use a specific software version in the image and keep it updated - if you want to use, for example, node to create your image, remember to specify the exact version, which you can find on Docker Hub. If you don't specify the so-called 'tag,' the latest version will be downloaded - and it will be different every time if you rebuild your image in the future. Choosing a specific version ensures that the software is controlled and consistent, i.e., you know on which base image you are building, and you can be sure that your application will work. However, it is advisable to periodically update and raise the version on which our software runs, but this should be done in a developer-controlled manner.
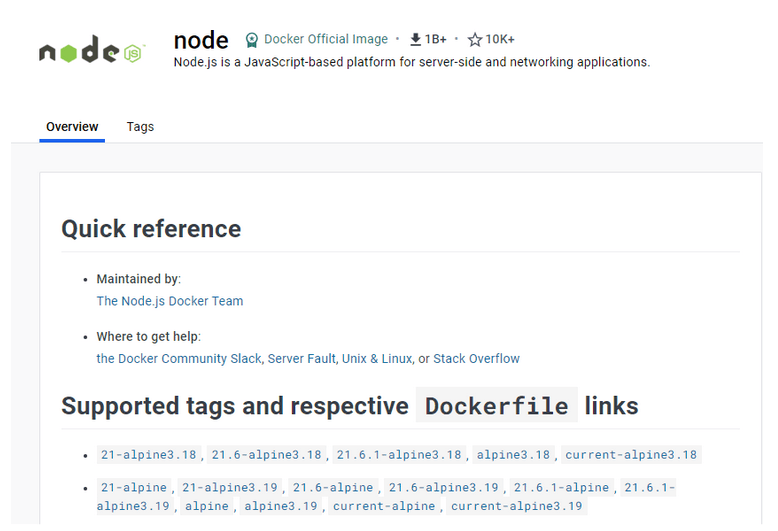
Figure 2 - node on Docker Hub, supported tags that we can choose by writing our Dockerfile
Use apt-get update and apt-get install -y in one line - if we install additional external packages inside our image using any package manager (here apt), both these commands should be entered on the same line using the Linux && operator. Otherwise, there may be issues with cached layers.

Figure 3 - proper use of apt-get update and install, source: Docker documentation
This technique is known as 'cache busting.' It is also valuable to specify specific software versions, which is known as 'version pinning.' This forces Docker to retrieve a specific software version regardless of what is in the cache. It's worth noting that versioning issues don't end here. Specific versions should also be specified in special files of our application, such as package.json or requirements.txt. The general idea that should guide us is 'do it in a way that gives you the most control over the versions of the software you install.'
Use the smallest possible images offering the minimum functionality to run your application - this will positively impact security and reduce the size of the built image. Avoid images with unnecessarily many additional tools/libraries that your application does not use. This increases the attack surface and prolongs the time it takes to build, push, and pull images. A very popular image used in many other images that developers use (e.g., node authors) is Alpine, whose basic version weighs only 5MB. So, if your image for node or python has alpine in its name, it's a good sign - it likely means it is built in an optimal way.
Use multi-stage builds - if the programming language you use leaves certain artifacts (compilation products) that you then run, it's worth considering splitting the Dockerfile into two parts - building and running. If the application is written in Java, we can install dependencies specified in the pom.xml file using Maven. The 'mvn package' command will produce a working .jar file containing the application and all dependencies, which we can then run in a completely different image in the second step. Below, this is the JRE, which stands for Java Runtime Environment, in the appropriate version.
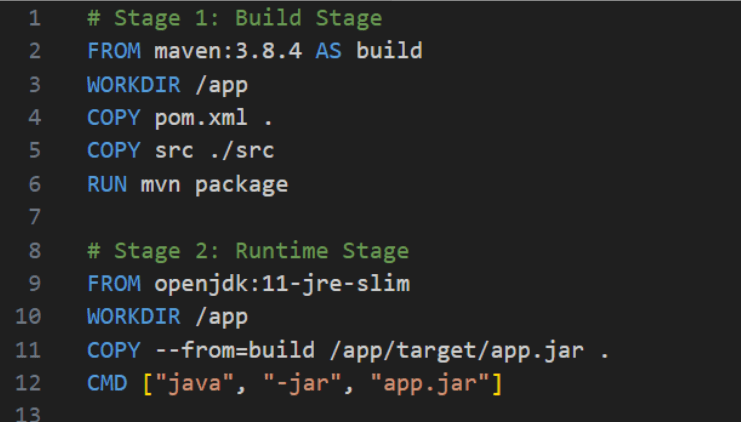
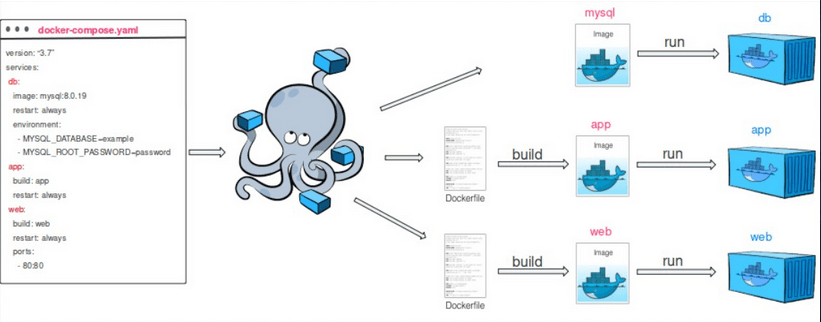
Figure 4 - Dockerfile with the so-called 2-stage build
Let's also pay attention to the COPY command in Stage 2 - it has the flag --from=build, where 'build' is the name specified in the second line of the first step. This means that we avoid burdening the resulting image with unnecessary dependencies. Some of the images running at runtime are advertised on the internet as 'distroless,' meaning they have very slim dependencies without package managers or shells. On this topic, we recommend Red Hat's article.
Summary
That's all for today, but it's certainly not the end of all the advice we have for you regarding Docker. If you're interested, we encourage you to join us next week, where we'll be developing even more valuable content that will positively impact the quality of your projects. See you next week!
Sources: