Helm for the Second Time – Versioning and Rollbacks for Your Application
We describe how to perform an update and rollback in Helm, how to flexibly overwrite values, and discover what templates are and how they work.
 Author:
Have you ever wondered what it’s like to work as a server administrator? How is it possible for one administrator to manage dozens, hundreds, or even thousands of machines? Even a single device can be a problem in terms of configuration, operation, or maintenance, let alone larger orders of magnitude. The scaling problem exists in many industries, including the IT sector. Without the right approach, tools, and knowledge, it’s impossible to effectively manage server infrastructure due to its complexity and the amount of data that needs to be processed to draw correct conclusions about it. Fortunately, there are many methods that help administrators in their daily work. Among them, we can mention solutions such as:
Today, as Innokrea, we will focus on the last category and show you how to effectively monitor your infrastructure and how to install and operate Zabbix software.
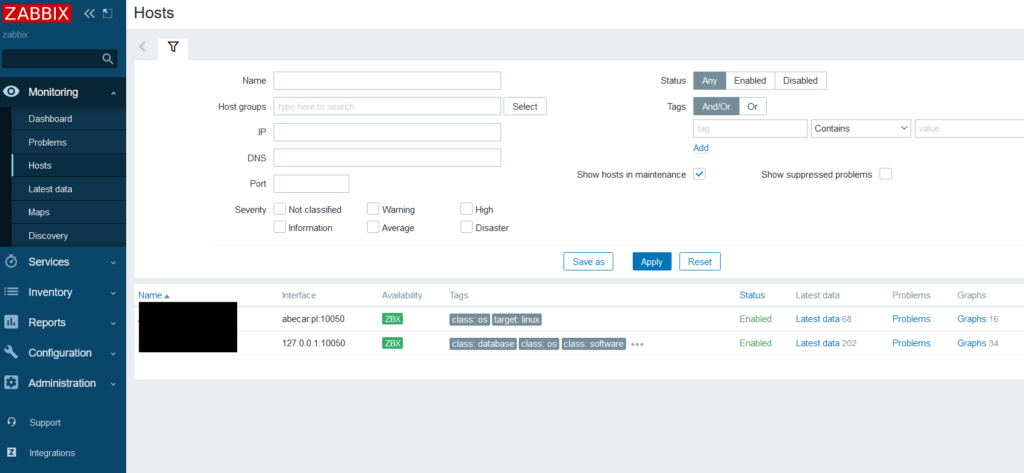
Photo 1. View from the Zabbix administrator panel
Purchasing a server and domain
To install the software, you need to purchase a VPS server that meets the appropriate resource requirements. The Zabbix documentation specifies minimum requirements of 128 MB of RAM and 256 MB of disk space. However, if the server is intended for more than just training for a beginner administrator, it is important to consider that the workload significantly increases when collecting and processing large amounts of data from multiple devices. For example, for two devices sending about 260 parameters that are displayed on charts, the server’s RAM usage exceeds 1 GB. Additionally, it’s worth purchasing a domain in order to configure a certificate and enforce data encryption on the server through the HTTPS protocol. It’s also important to properly configure the domain to point to our VPS server.
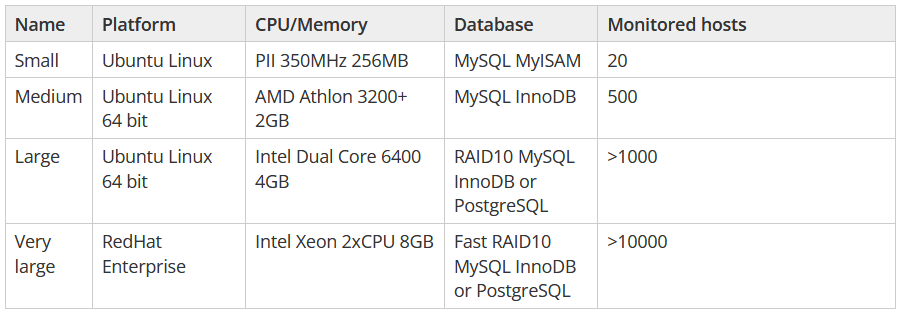
Photo 2. Requirements table from the Zabbix documentation
Before purchasing a VPS, it’s also worth checking which Linux distributions are supported by Zabbix and whether each component (server, agent, proxy) is offered on a particular platform. This increases the likelihood of trouble-free installation and operation of the software on the server.
Installation
Before installation, it’s worth executing the following commands (they may vary depending on the chosen Linux distribution):
sudo apt-get update && sudo apt-get upgrade
Pobierze ono informacje o najnowszych paczkach z repozytorium oraz pobierze i zaktualizuje zależności do najnowszej możliwej wersji.
It will retrieve information about the latest packages from the repository and download and update dependencies to the latest possible version. When it comes to administrative software, it is recommended to choose a version marked as LTS, which stands for Long Term Support. This means that the software is supported by the manufacturer and will be updated. We choose the version, the system on which we install, the component (in this case, server and frontend), the database, and the webserver on which the admin panel will be located. In the case of the presented installation, the following were selected in order: 6.0 LTS, Debian 10, Server Frontend Agent, MySQL, Apache. To install the server, we will use the Zabbix documentation, which guides the administrator through the process in detail. https://www.zabbix.com/download Then, after entering our domain (or IP address if we don’t have a domain), the installation panel should appear, which should be completed.
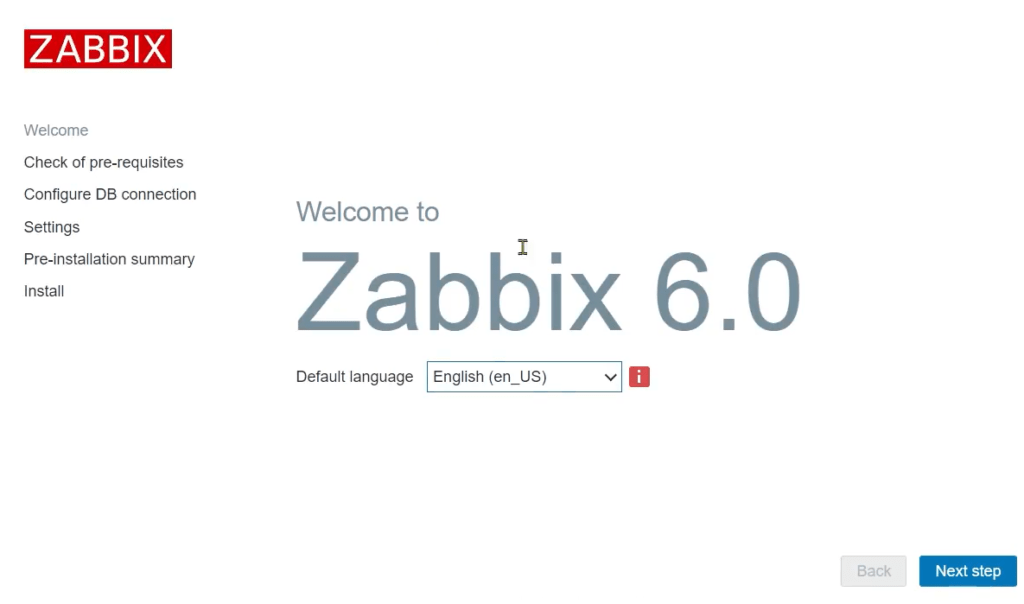
Photo 3. Installer visible from the browser level
Certificate
An important element that affects the security of administration is the installation of a certificate, which allows for encrypting the connection between the administrator and their Zabbix panel. There are many ways to obtain and install such a certificate, but the easiest seems to be getting it from Let’s Encrypt, a company that provides this service for free. Since we are using an Apache server, we can use the Certbot software, which will request the certificate from the certification authority on behalf of the administrator, and then install it. However, it is important to disable any additional firewall rules on the server or on the administrator panel side, as the Certification Authority server may not be able to verify whether the domain belongs to us if it is blocked by a firewall. To install Certbot:
apt-get install certbot
Next execute the command:
certbot –apache
The second command will perform the so-called HTTP-01 challenge via the ACME protocol and confirm that the domain assigned to the server actually belongs to us. If we wanted to automate the certificate renewal process, we could do it, for example, through the cron program in the Linux system. It’s worth checking if it’s possible to renew the certificate by using the following command:
sudo certbot renew –dry-run –agree-tos
The “—dry-run” switch causes it to be only a test, not a real renewal.
If this method did not work, we can also do it manually using these commands:
apt-get install letsencrypt
apt-get install python-pip
pip install –upgrade pip
pip install certbot
certbot certonly –manual –preferred-challenges dns –email admin@exampledomain.pl –domains *. exampledomain.pl
However, installing such a certificate goes beyond the scope of this article due to differences in system versions and the Apache web server itself. A manual certificate in this case will be installed using the DNS ACME Challenge, which requires adding the appropriate TXT record to the DNS zone. If we want to automate this process, it will require connecting to our DNS provider’s API. It is worth noting that not every provider exposes an API that allows for the automatic addition of TXT records. However, there are relevant links to articles discussing this process in the sources.
After installation, it is also necessary to change the administrator password selected during the Zabbix software installation, as it was not established through a secure communication channel.
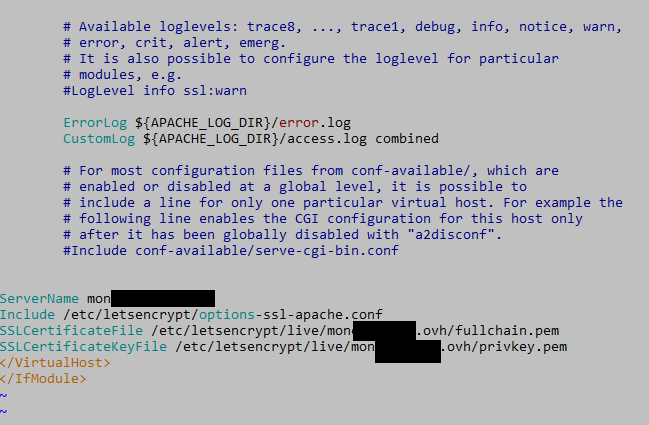
Photo 4. Editing paths to the certificate in the Apache server configuration. The file is default-le-ssl.conf.
Redirect to HTTPS
In case of automatic certificate mounting using the –apache switch, we will be asked whether we want to redirect all traffic to the encrypted channel – this option should be confirmed. In the case of manual certificate installation, the administrator is responsible for redirecting traffic by entering the appropriate rules into the httpd.conf file (or other web server configuration file, depending on the version we are using).
Summary
Due to constant changes in the software, installation can cause problems even for experienced administrators. The basic criterion that determines our success in this case is the appropriate choice of Linux distribution and the version of the Zabbix software. Regardless of everything, it is also worth remembering to choose appropriately strong passwords – whether we are setting them for an SSH connection, a Linux system account, a database, or an administrative panel of the system. In the next article, we will describe how to safely configure a remote agent on the server.
Sources:
https://www.freecodecamp.org/news/sudo-apt-get-update-vs-upgrade-what-is-the-difference/ https://www.zabbix.com/download
https://www.zabbix.com/documentation/1.8/en/manual/installation/requirements
https://letsencrypt.org/docs/challenge-types/
https://www.cyberciti.biz/faq/issue-lets-encrypt-wildcard-certificate-with-acme-sh-and-cloudflare-dns/
https://gist.github.com/samson-sham/b23fbbfc2b165f9763dc920470303e9c
https://eff-certbot.readthedocs.io/en/stable/using.html

Helm for the Second Time – Versioning and Rollbacks for Your Application
We describe how to perform an update and rollback in Helm, how to flexibly overwrite values, and discover what templates are and how they work.
AdministrationInnovation
Helm – How to Simplify Kubernetes Management?
It's worth knowing! What is Helm, how to use it, and how does it make using a Kubernetes cluster easier?
AdministrationInnovation

INNOKREA at Greentech Festival 2025® – how we won the green heart of Berlin
What does the future hold for green technologies, and how does our platform fit into the concept of recommerce? We report on our participation in the Greentech Festival in Berlin – see what we brought back from this inspiring event!
EventsGreen IT