Docker – how to simplify running and deploying applications? (part 3)

Are you wondering what troubles a beginner Docker user may encounter? What are Bind Mounts and what are the dangers of incorrect use? How can you deal with these problems that arise in Docker? Innokrea encourages you to read and expand your knowledge.
Bind Mounts
Bind Mounts are Docker system components managed by the Docker user. They solve a different problem than volumes. If you want to change code and see the changes in your application, you have to rebuild the image every time. Proper use of Bind Mounts makes changes immediately visible in the running container. The idea is to connect a specific folder with our code on the host machine to the container, so that it can be accessed from both the container (for the application to run) and the host (for code editing). Changes to the code will be immediately visible.
While volumes are for persistent data, Bind Mounts are for editable data.
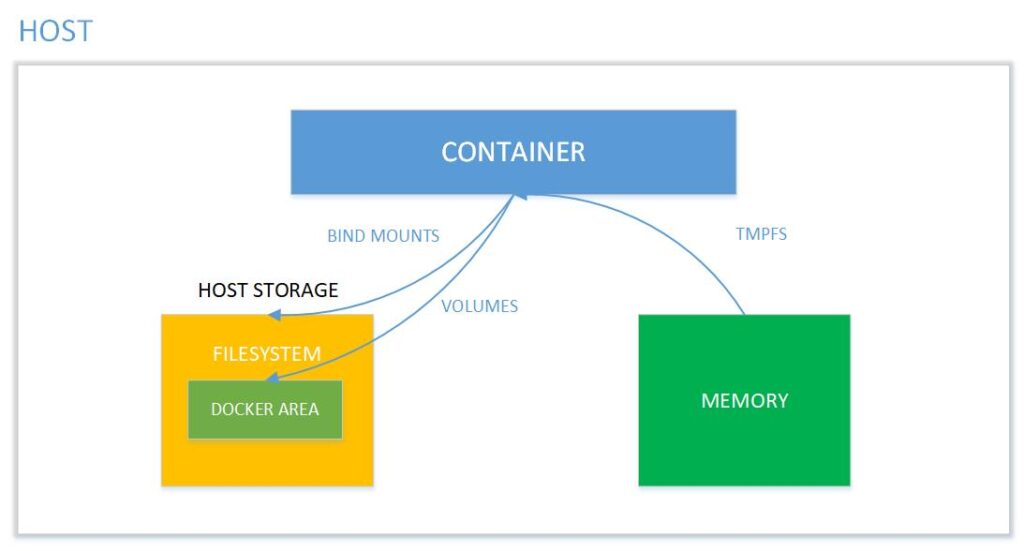
Picture 1: Memory mapping between the container and the host system. Source: binarymaps.
Note the way bind mounts are marked in the diagram. The difference between a volume and a bind mount is that a volume is fully managed by Docker, while a bind mount has direct access to the host’s file system.
Live code reloading
As we mentioned, the bind mount mechanism allows for file replacement from the host in a running container without the need to rebuild the image. Does this mean that when we program an application, we can immediately see changes when we edit a given file? Well, it depends on the technology we are using. If we use, for example, the Python interpreter for our program and develop the application using the Flask framework, it is perfectly possible, provided that we do not make any syntax errors. If any errors occur, the application may crash and require container reset. Sometimes, as in the case of using the React.js framework, files are not dynamically loaded into the program’s memory when edited, and an external plugin (e.g., nodemon) needs to be installed, which will detect file changes and re-interpret the edited code. The issue becomes even more complicated for partially compiled languages like Java. It is possible to set up recompilation after file editing, but from our experience, it is more problematic.
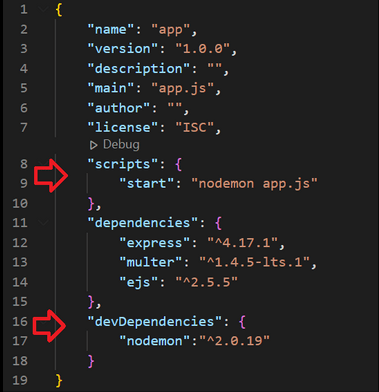
Picture 2: Specification of an additional dependency nodemon, allowing for dynamic code reloading in a running container in a React.js application.
Other problems
Another, rather unexpected problem is when we accidentally replace necessary files in the container. Let’s explain this using the examples of Flask and React.js frameworks. If our application requires dependencies, in the case of Python, we use the pip tool and the requirements.txt file to install them during image building. Mounting a bind mount does not change anything in the installed dependencies, because the source files of the code and dependencies are located in different places. In the case of React.js and Node, however, we use the npm tool and the package.json file. Dependencies are installed in the folder where the package.json file and usually the code are located. Mapping with a bind mount overwrites the entire folder with the one on the host, which means that after mounting, our modules will disappear if they are not installed in the folder on the host. The application will start returning errors about missing modules.
To fix the problem of overwritten dependencies, we simply need to create a volume in the container where we do not want to overwrite – preferably an anonymous volume. It can be specified from the Dockerfile or specified during runtime using the “docker run -v /app/node_modules” command. Creating a volume means that the folder is managed by Docker, not the user. This folder will not be overwritten by the bind mount.
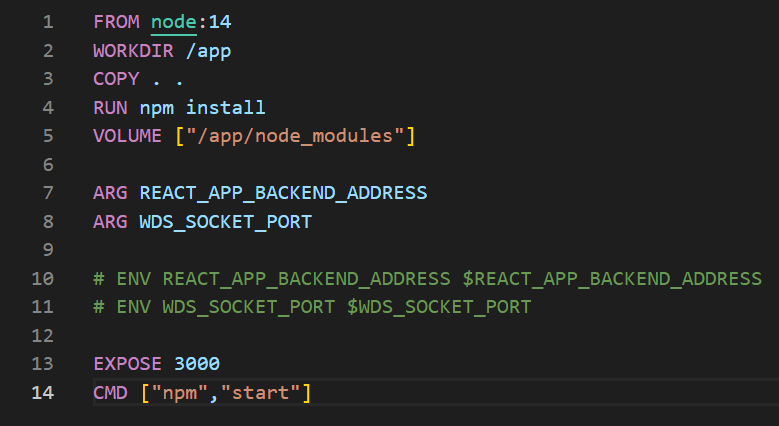
Picture 3: Let’s pay attention to the fifth line that protects the node_modules folder from replacement with bind mount.
Correct use of bind mounts is not a trivial matter and requires a thorough understanding of what is actually happening. Since one host folder can be used by multiple containers, a good practice is to map it in read-only mode using :ro option. This prevents containers from writing content to the hosting system. Writing to the host system should be done through volumes. In summary, it is worth making sure that code modification can only occur from the host system, while allowing necessary files generated/sent from the container to be saved to the host via volumes.
Environment Variables
First of all, it is worth explaining what environment variables are. They are variables in our system used by programs. Such a variable can affect the operation of processes running in the operating system and can be a communication mechanism or store a value for later use. In Docker, such variables can be specified in the Dockerfile and given their default value. Then, during runtime, it is possible to override them using the -e parameter.
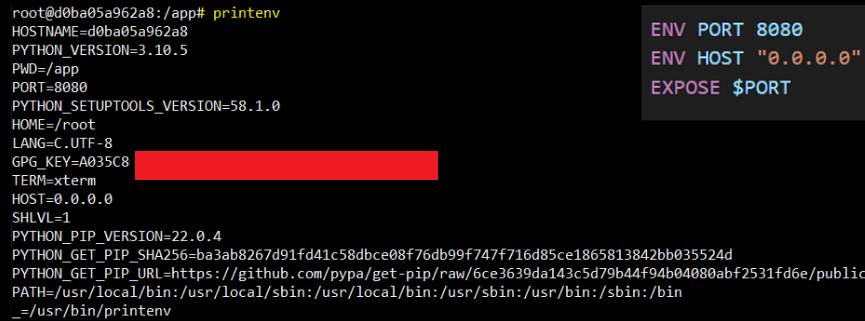
Picture 4: Example container environment variables, next to the content of the Dockerfile.
By using environment variables, we can run a container by parameterizing the variables labeled as ENV in the Dockerfile without rebuilding the image, by providing parameters during container startup (docker run). This way, we can, for example, change the code fragment responsible for the port on which the application runs. Additionally, it’s worth mentioning that environment variables can be used to pass certain secret data to the container, such as keys or passwords. Such things should not be hardcoded into the image because they can be retrieved from the image using the command docker history <image-id>. Encoding secret information as environment variables is also not the best practice possible (check docker secret), but it is commonly seen in practice. It’s also a good practice to use the .env file, which should be excluded from version control to avoid exposing such secret variables to the repository if we consider the variables to be confidential.
.dockerignore file
We should also add a “.dockerignore” file to our application repository, in which we specify files and folders that we do not want to transfer inside the image as a result of the COPY . . instruction in the Dockerfile. Of course, we could also specify specific files and folders in the Dockerfile, but this way using .dockerignore is more convenient. Generally, the .dockerignore file should contain all files and folders that are not essential for the operation of our application, such as “Dockerfile”, “.git”, “node-modules”, or are potentially dangerous, such as tokens, private keys, or login data. Referring to the well-known GIT version control system, we can summarize it as follows:
- The .gitignore file in GIT is used to list files that are not to be tracked during changes in the repository.
- The .dockerignore file allows us to specify a list of files or directories that Docker should ignore during the build process.
Summary
Today, we have discussed all the most basic Docker concepts that a beginner user needs to know. We particularly encourage you to analyze the problems presented in this article and in the previous ones (docker – part 1 & part 2). In the final episode (part 4), we will talk about docker-compose and summarize and expand on aspects related to container security.
Source:
https://binarymaps.com/docker-storage/
https://pl.wikipedia.org/wiki/Wirtualizacja
https://www.atlassian.com/pl/microservices/cloud-computing/containers-vs-vms
https://www.ibm.com/cloud/blog/containers-vs-vms